Mounting an ultra wide monitor correctly is essential for achieving the best viewing experience, ensuring ergonomic comfort, and maintaining a clean and organized workspace. Whether you are setting up a gaming station, a professional workstation, or a hybrid environment that includes projectors, proper mounting makes a noticeable difference. Understanding concepts like short throw projector distance, projection throw distance, and how far the projector should be from the screen can also be helpful when using a projector alongside an ultra wide monitor. In this blog, we will cover everything you need to know to mount an ultra wide monitor properly and safely.
Why Proper Mounting Matters
Ultra wide monitors are wider and often heavier than standard monitors. Improper mounting can lead to discomfort, reduced productivity, and even damage to your monitor or wall. Correct positioning improves posture, reduces eye and neck strain, and creates a more immersive viewing experience for both work and entertainment.
Additionally, wall mounting or using monitor arms frees up desk space, giving your setup a clean and modern look. It allows you to adjust the height, tilt, and swivel easily, ensuring the monitor is always at the right angle.
Step 1: Choose the Right Mount
Selecting the correct mount for your ultra wide monitor is the first and most important step.
Check VESA Compatibility
Most ultra wide monitors come with VESA mounting holes on the back. These standardized mounting patterns make it easy to find compatible mounts. Make sure the mount you choose matches the VESA pattern of your monitor.Weight Capacity
Ultra wide monitors are typically heavier, especially models with curved screens. Verify the mount’s weight capacity to ensure it can support the monitor securely.Mount Type
Fixed Wall Mounts keep the monitor flush against the wall. They are ideal for setups where you do not need frequent adjustments.
Tilt Mounts allow you to angle the monitor up or down for better viewing comfort.
Full-Motion or Articulating Arms offer the most flexibility. You can pull the monitor closer, push it back, or adjust its angle as needed.
Step 2: Select the Ideal Mounting Position
The position of your ultra wide monitor directly affects your comfort and the usability of your space.
Height
The top edge of the monitor should be at or slightly below your eye level when sitting straight. This reduces neck strain during long sessions.Distance
The ideal distance depends on the size and curvature of your ultra wide monitor. As a general rule, sit approximately one arm’s length away from the screen. For very large monitors, a slightly greater distance may be more comfortable.Centering
Ensure the monitor is centered relative to your sitting position to avoid awkward neck movements.Multiple Displays or Projectors
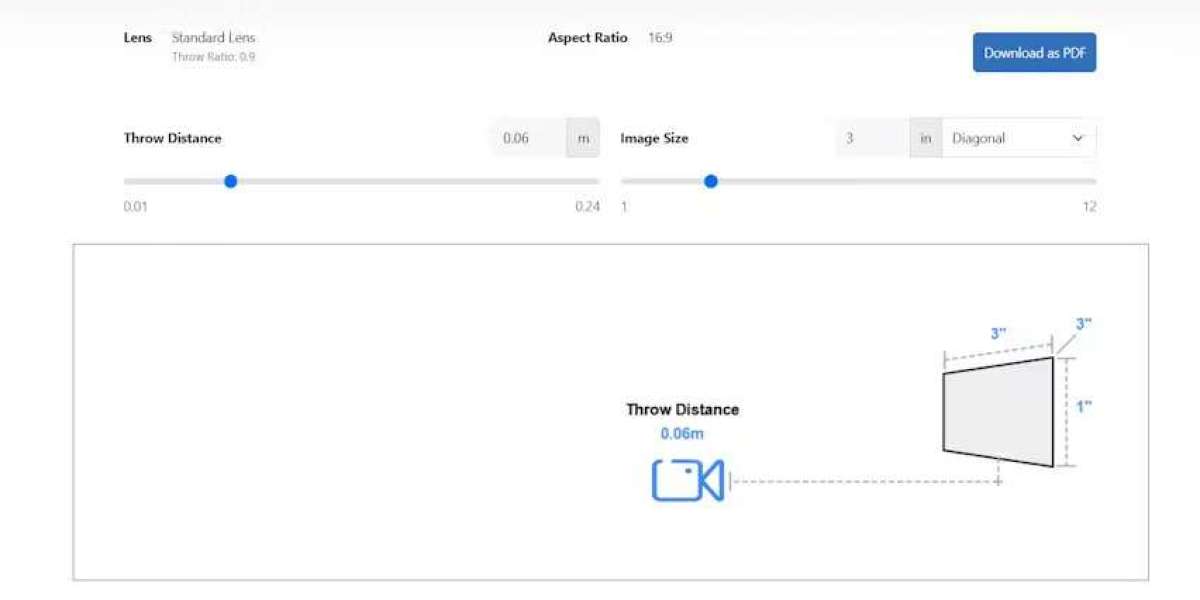
If you are integrating the monitor with a projector, consider projection throw distance and short throw projector distance. Understanding how far the projector should be from the screen ensures proper alignment and balance between both displays.
Step 3: Prepare the Wall or Mounting Surface
Locate Wall Studs
For wall mounts, always attach the mount to wall studs. This provides the necessary support to handle the monitor’s weight. Use a stud finder to locate them accurately.Mark the Mounting Points
Once you decide on the ideal height and position, mark the points where you will drill holes for the mount. Use a level to ensure everything is perfectly aligned.Drill Pilot Holes
Drilling pilot holes makes it easier to screw in the mounting hardware and reduces the risk of damaging the wall.
Step 4: Install the Mount
Attach the Mount to the Wall
Secure the wall plate or bracket to the wall using heavy-duty screws. Double-check the level before fully tightening the screws.Attach the Bracket to the Monitor
Connect the monitor bracket or mounting plate to the back of your ultra wide monitor. Make sure all screws are tight but do not over-tighten them, as this could damage the monitor.Hang and Secure the Monitor
Once both parts are attached, carefully lift and mount the monitor onto the wall plate. Many mounts include safety locks or screws to secure the monitor in place.
Step 5: Cable Management
Proper cable management keeps your setup neat and prevents cables from pulling or getting damaged.
Use Cable Clips or Channels
Run cables along the wall or desk using clips or cable channels to keep them out of sight.Leave Some Slack
If you are using an articulating arm, leave some slack in the cables so they can move freely without strain.Group and Label Cables
Group cables together and label them for easy identification. This helps during future maintenance or upgrades.
Step 6: Adjust the Monitor
Once mounted, fine-tune the monitor’s tilt, swivel, and height for maximum comfort. Sit in your usual position and adjust until the monitor aligns naturally with your line of sight.
Integrating with Projectors and Other Displays
In some setups, ultra wide monitors are paired with projectors for hybrid viewing or presentations. In such cases, understanding projection throw distance and short throw projector distance helps maintain proper alignment between the two. Knowing how far the projector should be from the screen ensures the projected image complements the monitor’s display without overlap or distortion.
For example, in a conference room, an ultra wide monitor can serve as a control hub, while the projector displays content for a larger audience. Correct mounting ensures both displays work harmoniously.
Common Mistakes to Avoid
Ignoring Weight Limits
Using a mount that cannot support the monitor’s weight can lead to accidents or damage.Incorrect Height
Mounting the monitor too high or too low can cause discomfort and strain.Poor Cable Management
Tangled or hanging cables make the setup look messy and can lead to damage over time.Skipping Wall Studs
Mounting on drywall without proper support can cause the mount to loosen or fail.
Final Thoughts
Mounting an ultra wide monitor correctly enhances both aesthetics and functionality. By choosing the right mount, positioning it properly, and integrating good cable management practices, you can create an ergonomic and efficient workspace.
In hybrid setups, understanding short throw projector distance, projection throw distance, and how far the projector should be from the screen ensures smooth coordination between monitors and projectors.
Whether you use your ultra wide monitor for gaming, work, or presentations, proper mounting not only protects your investment but also creates a more immersive and comfortable experience. With careful planning and precise installation, your ultra wide monitor can transform your space into a clean, organized, and productive environment.
Read more: https://view.reviewsconsumerreports.com/live/how-to-split-screen-effectively-on-ultra-wide-displays