Short throw projectors are an excellent choice for home theaters, classrooms, and offices. Their ability to project large, bright images from a limited projection throw distance makes them ideal for small spaces. While many users prefer professional installation, DIY wall mounting is a practical solution for those who want to save costs or customize their setup. Understanding how to calculate short throw projector distance and how far the projector should be from the screen is essential for a successful installation. A well-mounted projector ensures optimal image quality and reduces shadows or distortion, making your viewing experience as immersive as an ultra wide monitor.
Why Wall Mount a Short Throw Projector
Wall mounting a short throw projector provides several benefits:
Space efficiency: Keeps the projector off desks or shelves, freeing up room for other equipment.
Professional appearance: A neatly mounted projector enhances the aesthetics of the room.
Stable projection: Reduces the risk of movement, misalignment, or accidental bumps.
Optimized image quality: Proper placement ensures the projector covers the screen evenly without distortion.
Tools and Materials Needed
Before starting your DIY wall mount, gather the following tools and materials:
Wall mount bracket compatible with your projector
Screws and anchors suitable for the wall type
Measuring tape
Level
Pencil or marker
Drill with appropriate bits
Screwdriver
Stud finder for securing heavy projectors
Understanding Short Throw Projector Distance
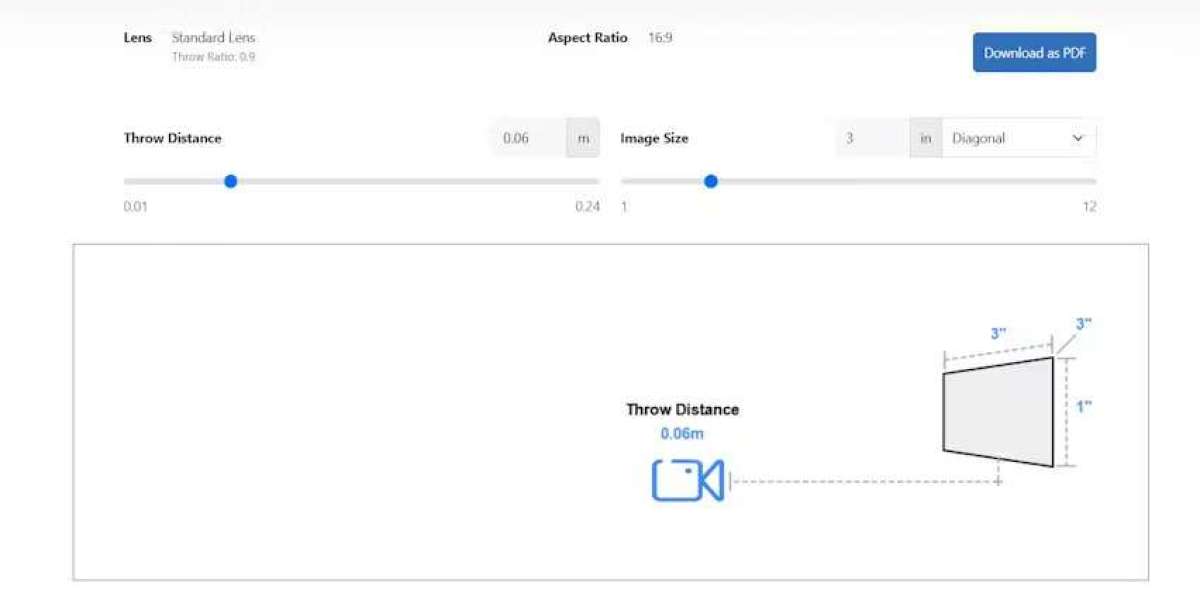
One of the most critical aspects of mounting a short throw projector is determining the correct short throw projector distance. This distance is influenced by the projector’s throw ratio and the width of the screen or projection area. The formula to calculate the projection throw distance is:
Throw Ratio = Projection Throw Distance ÷ Image Width
For instance, if your projector has a throw ratio of 0.5:1 and you want a 100-inch wide image, the ideal short throw projector distance is 0.5 × 100 = 50 inches. Calculating this distance ensures the projector is mounted at the correct height and depth relative to the screen. Proper measurement prevents image distortion and maintains sharpness across the entire display.
Step by Step DIY Wall Mounting Guide
Choose the projector location
Select a wall location that allows the projector to project the image without obstruction. Ensure the surface is strong enough to support the projector weight and is within the calculated short throw projector distance.Measure the screen width and height
Accurate measurement of your screen ensures correct alignment. Consider whether the projector will be mounted above, below, or at screen level.Mark the wall for mounting
Use a level to mark the spots for drill holes. This step ensures that the projector will sit straight and centered on the screen.Locate wall studs
Use a stud finder to locate studs for securely mounting the bracket. Anchors alone may not support heavier projectors over time.Install the wall bracket
Drill holes at the marked spots, insert anchors if needed, and secure the bracket with screws. Make sure it is level and tightly fixed.Attach the projector
Secure the projector to the wall bracket according to the manufacturer’s instructions. Adjust tilt or rotation as needed to align with the screen.Adjust focus and throw distance
Use the projector’s lens shift or zoom if available. Confirm the short throw projector distance is accurate to ensure the image fills the screen correctly.Test the projection
Display a test image to check alignment, focus, and brightness. Make minor adjustments as needed to achieve optimal image quality.
Using Short Throw Projectors as Ultra Wide Monitors
Short throw projectors can also serve as alternatives to ultra wide monitors. Mounting them on the wall allows for large, immersive displays suitable for collaborative workspaces, classrooms, or home offices. By calculating the correct projection throw distance and mounting the projector precisely, users can create a wide display area that replicates the experience of an ultra wide monitor without multiple screens.
Tips for a Successful DIY Installation
Choose a solid wall: Mount on a strong wall or use studs to ensure stability.
Consider cable management: Plan for power and HDMI cables to avoid clutter.
Use a level and measuring tape: Proper alignment is essential for a clear image.
Check projector specifications: Ensure your wall mount supports the projector weight and size.
Test before final tightening: Small adjustments before securing screws can prevent misalignment.
Common Mistakes to Avoid
Ignoring the minimum and maximum short throw projector distance, leading to image distortion
Mounting on weak walls or drywall without anchors
Failing to center the projector with the screen, causing misaligned projection
Overlooking lens shift or zoom adjustments, which can correct minor placement errors
Skipping test projection, which may reveal alignment or focus issues
Benefits of Proper DIY Wall Mounting
Enhanced viewing experience: Properly mounted projectors provide sharp, evenly distributed images.
Clean setup: Keeps your room organized and professional-looking.
Improved collaboration: Large, clear images facilitate presentations and group activities.
Flexibility: Mounted projectors can be adjusted or removed for different room arrangements without major disruption.
Conclusion
DIY wall mounting for short throw projectors is an achievable and cost-effective way to enhance your classroom, office, or home theater setup. Calculating the correct short throw projector distance and understanding how far the projector should be from the screen ensures optimal image clarity and alignment.
Whether used for presentations, collaborative work, or as an alternative to an ultra wide monitor, a well-mounted short throw projector delivers professional-quality visuals while saving space and improving room aesthetics. Following proper installation steps, taking accurate measurements, and testing the projection will help create a seamless and immersive viewing experience for any environment.
Read more: https://newyorktimesnow.com/blog/what-is-the-minimum-distance-for-a-short-throw-projector