XTEN-AV is a leading provider of AV design and project management solutions and offers tools that make calculating projector throw distances simpler and more accurate. For professionals and enthusiasts alike, understanding the throw distance of a long throw projector is crucial for designing optimal viewing experiences. Whether you are setting up a large conference room, a home theater, or a lecture hall, knowing how far to place your projector from the screen ensures the image fits perfectly and maintains its clarity.
Understanding Throw Distance and Throw Ratio
Before calculating throw distance, it is important to understand what throw distance is. Throw distance is the space between the projector lens and the screen. Long throw projectors typically have lenses that allow them to project large images from a considerable distance, making them ideal for large rooms or venues with fixed installations.
Closely related to throw distance is the throw ratio. The throw ratio is a specification provided by the projector manufacturer and is calculated by dividing the distance from the projector to the screen by the width of the projected image. For example, if a projector has a throw ratio of 2.0 and you want an image 10 feet wide, the projector needs to be placed 20 feet from the screen. The formula looks like this:
Throw Distance = Throw Ratio x Screen Width
Understanding the throw ratio is essential because it guides placement and ensures the image does not exceed the screen boundaries. Long throw projectors often have throw ratios above 2.0, which is considerably higher than short throw or ultra short throw projectors.
Factors Affecting Throw Distance Calculations
Several factors can influence how you calculate throw distance for a long throw projector.
Screen Size: The desired screen size is the most critical factor. Larger screens require longer throw distances. Measuring the width of the screen accurately will provide the baseline for your calculation.
Lens Type: Long throw projectors may come with fixed or zoom lenses. A zoom lens allows some flexibility in throw distance and image size without physically moving the projector.
Room Constraints: The physical dimensions of the room, including ceiling height and obstructions, can affect projector placement. It is important to ensure there is sufficient distance to accommodate the throw ratio while maintaining safe installation practices.
Image Quality: Projectors have optimal distances where image sharpness, brightness, and focus are maximized. Placing the projector too close or too far from the screen can reduce image quality. Manufacturers often provide a recommended distance range to help installers achieve the best results.
Step by Step Guide to Calculating Throw Distance
Here is a practical approach to calculating throw distance for a long throw projector:
Determine Screen Width: Measure the width of your screen in feet or meters. For example, assume your screen width is 12 feet.
Find the Throw Ratio: Check the projector specifications for the throw ratio. If the ratio is given as a range, for example 2.0 to 3.0, it means the projector can project a given image width from a distance two to three times that width.
Apply the Formula: Multiply the screen width by the throw ratio. Using the example above, if your throw ratio is 2.5 and your screen width is 12 feet:
Throw Distance = 12 x 2.5
Throw Distance = 30 feetAdjust for Room Constraints: Ensure that the calculated distance fits within your room layout. If 30 feet is too far due to walls or obstructions, consider a projector with a shorter throw ratio or a zoom lens.
Check Manufacturer Guidelines: Always consult the projector manual for recommended distances and angles. This ensures the projector performs optimally and avoids image distortion.
Using Online Tools for Accurate Calculations
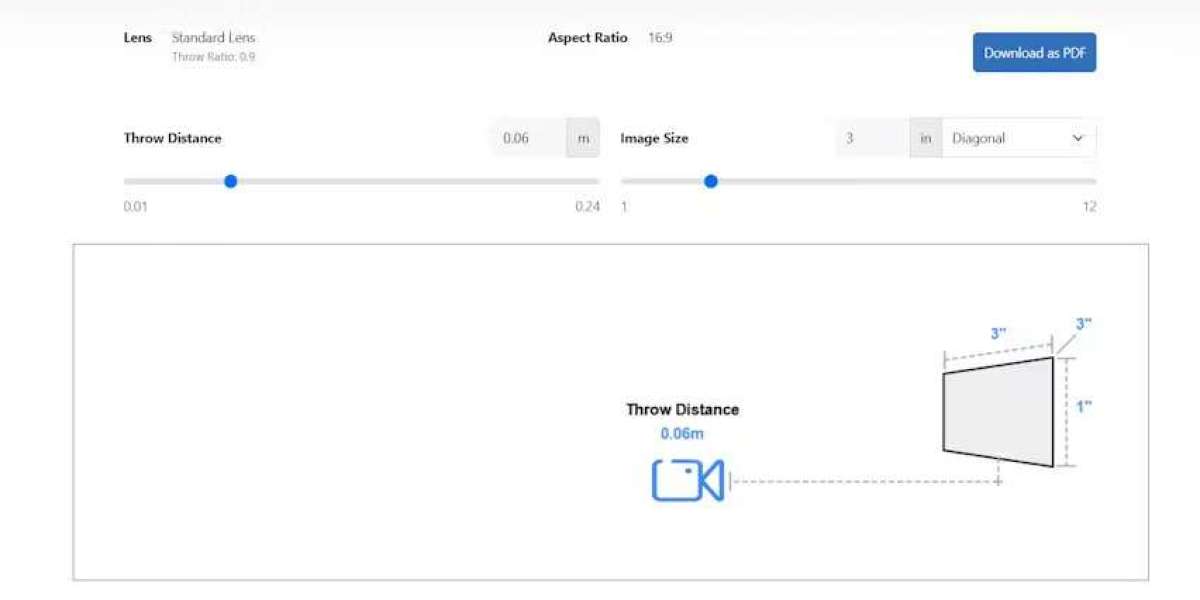
While manual calculations are useful, online projector throw calculators are increasingly popular. These tools allow you to input the screen size and projector specifications, and they instantly provide the optimal placement distance. Many calculators also allow adjustments for zoom lenses and keystone correction, making the installation process easier. XTEN-AV provides integrated solutions for AV designers that can calculate throw distances, display layouts, and lens positioning all within the same workflow. This eliminates guesswork and reduces errors during installation.
Why Accurate Throw Distance Matters
Getting the throw distance right is essential for several reasons:
Image Quality: Incorrect placement can lead to blurred images or uneven brightness across the screen. Long throw projectors need enough distance to project a focused image without distortion.
Audience Comfort: Too small or too large images can strain the audience’s eyes. Calculating throw distance ensures the projected content is comfortable to view.
AV System Integration: Long throw projectors are often part of larger AV setups in conference rooms or auditoriums. Accurate placement ensures the projector works well with lighting, screens, and other AV equipment.
Future Proofing: Proper placement considers potential room changes. For example, retractable screens or movable seating arrangements require flexible projector positioning, which is easier to plan when you have calculated throw distances accurately.
Tips for Long Throw Projector Installation
Use a Stable Mount: Long throw projectors are usually heavier and installed further from the screen, so a sturdy ceiling or wall mount is critical.
Consider Lens Shift: Many projectors offer vertical and horizontal lens shift. Using lens shift allows small adjustments without moving the entire projector.
Check Focus and Keystone Settings: Even with accurate throw distance, fine-tuning focus and keystone correction ensures the image is perfectly rectangular and sharp.
Account for Lighting Conditions: Long throw projectors may require higher brightness to compensate for ambient light, especially when projecting large images from a distance.
Conclusion
Calculating throw distance for a long throw projector is a straightforward process once you understand the throw ratio and the factors that influence projector placement. By measuring the screen width, applying the throw ratio, and considering room constraints, you can ensure optimal image quality and viewing experience. Modern tools, including those offered by XTEN-AV, make these calculations more precise and save time during installation. Accurate throw distance not only enhances the image but also ensures that your AV setup integrates seamlessly into the space. Investing time in proper calculation and planning can prevent common issues such as image distortion or poor brightness, ultimately providing a professional and immersive viewing experience for your audience.
Read more: https://logcla.com/blogs/934375/Where-can-I-find-a-free-projector-throw-distance-calculator