Projector setup can be a complex task, especially when it comes to determining the correct distance from the screen. An incorrectly positioned projector can result in poor image quality, distorted dimensions, or even shadow interference. This is where Throw Distance Calculators become essential tools for professionals and home theater enthusiasts alike. These calculators help you determine the optimal distance and lens requirements for your projector, ensuring a crisp, clear, and perfectly sized image. In this guide, we will explore how to choose the right throw distance calculator for your projector, factors to consider, and tips to maximize your viewing experience.
What Are Throw Distance Calculators?
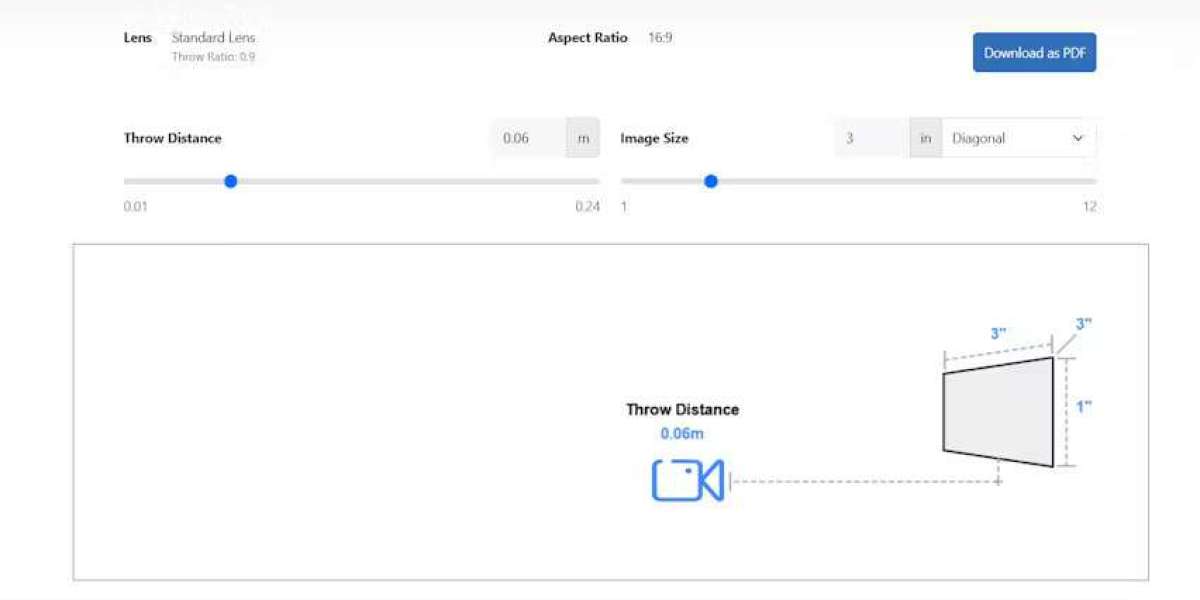
Throw Distance Calculators are tools that help determine the distance between a projector and the screen to achieve a specific image size. They use the projector's throw ratio, lens type, and screen dimensions to calculate the ideal placement. Many calculators are available online, in apps, or as part of projector setup software. Using a reliable throw distance calculator ensures your projector performs at its best, whether in a home theater, conference room, or large auditorium.
Why Using a Throw Distance Calculator Is Important
Setting up a projector without a throw distance calculator can lead to several issues:
Incorrect Image Size: Placing the projector too close or too far can distort the image or make it too small or too large for the screen.
Focus Problems: An incorrect throw distance can result in blurry or uneven images.
Lens Limitations: Different lenses have varying throw ratios that must be considered to avoid distortion.
Obstruction and Shadows: Improper placement may cause shadows from people or objects interfering with the projected image.
A good Throw Distance Calculator helps mitigate these risks and allows for precise planning before installation.
Key Factors to Consider When Choosing a Throw Distance Calculator
Not all throw distance calculators are created equal. When selecting one for your projector project, consider the following factors:
1. Compatibility with Your Projector
Ensure the calculator supports your projector brand and model.
Check if it accounts for different lens types such as short-throw, ultra-short-throw, or long-throw lenses.
Verify that it can handle multiple screen sizes and aspect ratios.
2. Accuracy and Precision
Choose calculators that provide precise measurements to avoid installation errors.
Look for tools that allow input of exact screen dimensions and projector specifications.
Some calculators offer advanced options such as lens shift, zoom range, and offset adjustments for increased accuracy.
3. Ease of Use
The interface should be intuitive, allowing quick entry of projector and screen specifications.
A calculator with visual guides or diagrams can help you understand placement options.
Online calculators and mobile apps often provide step-by-step instructions for convenience.
4. Support for Multiple Units
Check if the calculator allows switching between metric and imperial units.
This is particularly useful for international projects or when working with specifications in different measurement systems.
5. Additional Features
Some throw distance calculators offer advanced features that enhance usability:
Projection Angle Assistance: Helps determine the correct tilt and angle to avoid keystone distortion.
Lens Recommendations: Suggests compatible lenses for achieving the desired image size.
Room Layout Integration: Some calculators allow you to input room dimensions to plan the best projector placement.
Save and Export Options: Save your calculations for future reference or share with installation teams.
Types of Throw Distance Calculators
There are several types of throw distance calculators available:
1. Online Calculators
Many projector manufacturers and AV technology websites offer free online throw distance calculators:
Pros: Easily accessible, no installation required, often updated with new projector models.
Cons: Requires internet connection, may have limited advanced features.
2. Mobile Apps
Mobile apps provide throw distance calculations on-the-go:
Pros: Convenient for installers and field professionals, often include interactive diagrams.
Cons: Some apps may require in-app purchases for advanced features.
3. Software Integrated with AV Tools
Some AV design software includes throw distance calculators as part of their suite:
Pros: Integration with other design tools like room layout planners, lighting simulators, and 3D modeling.
Cons: Typically requires a subscription or higher upfront cost.
How to Use a Throw Distance Calculator Effectively
Using a throw distance calculator effectively requires attention to detail and a clear understanding of your projector and room setup. Follow these steps:
Step 1: Gather Projector Specifications
Note the throw ratio, lens type, zoom range, and any lens shift capabilities.
Verify maximum and minimum image sizes supported by the projector.
Step 2: Measure Your Screen and Room
Measure the width, height, and aspect ratio of the screen.
Note the distance from the ceiling or wall where the projector will be mounted.
Step 3: Input Data into the Calculator
Enter projector specifications, screen dimensions, and room constraints into the throw distance calculator.
Adjust settings for lens shift, zoom, and tilt if the calculator allows.
Step 4: Review Placement Recommendations
The calculator will provide the ideal distance and angle for projector placement.
Compare options to ensure the projection path is clear of obstructions and shadows.
Step 5: Test and Fine-Tune
After installation, test the projected image and make minor adjustments if necessary.
Ensure the image is sharp, properly aligned, and fills the screen as intended.
Benefits of Using a Throw Distance Calculator
Time Savings: Quickly determine optimal placement without trial and error.
Precision: Achieve the best image quality and screen coverage.
Reduced Installation Errors: Avoid common mistakes such as incorrect distances or angles.
Cost Efficiency: Prevent the need for repositioning or additional hardware due to miscalculations.
Enhanced Viewing Experience: Ensure sharp, well-sized images for presentations, movies, or educational purposes.
Conclusion
Selecting the right Throw Distance Calculator is critical for any projector installation, whether for a home theater, office, or large venue. By considering factors such as projector compatibility, accuracy, ease of use, and additional features, you can ensure precise placement, optimal image quality, and a smooth installation process.
Web-based calculators, mobile apps, and integrated AV software all provide valuable options depending on your project requirements. Collecting accurate projector and room measurements, inputting them carefully, and following the calculator’s recommendations will help you achieve professional-grade results.
A reliable throw distance calculator not only simplifies the setup process but also enhances the viewing experience, saving time and reducing errors. For professionals and home users alike, investing in a quality tool ensures that every projection is clear, correctly sized, and perfectly aligned, providing the ultimate in convenience and visual performance.
Read more: https://avprohub.jimdofree.com/2025/10/06/5-simple-throw-distance-calculators-for-beginners/