When I started my small brand, I didn’t think much about logos or embroidery. I just wanted my products to look nice. But once I got into branding, I realized design matters—a lot. That's when I discovered embroidery digitizing services in the USA. It changed my work completely.
If you're thinking about stepping up your brand visuals, keep reading. This might help you skip the mistakes I made early on.
I Used To Guess My Embroidery Sizes (It Was A Mess)
When I first started adding embroidery to my products, I thought I could just “eyeball” the sizes. That was a mistake. Some logos were too small to read. Others looked fine on a cap but turned into a disaster on a jacket. I didn’t know how different items needed different size placements.
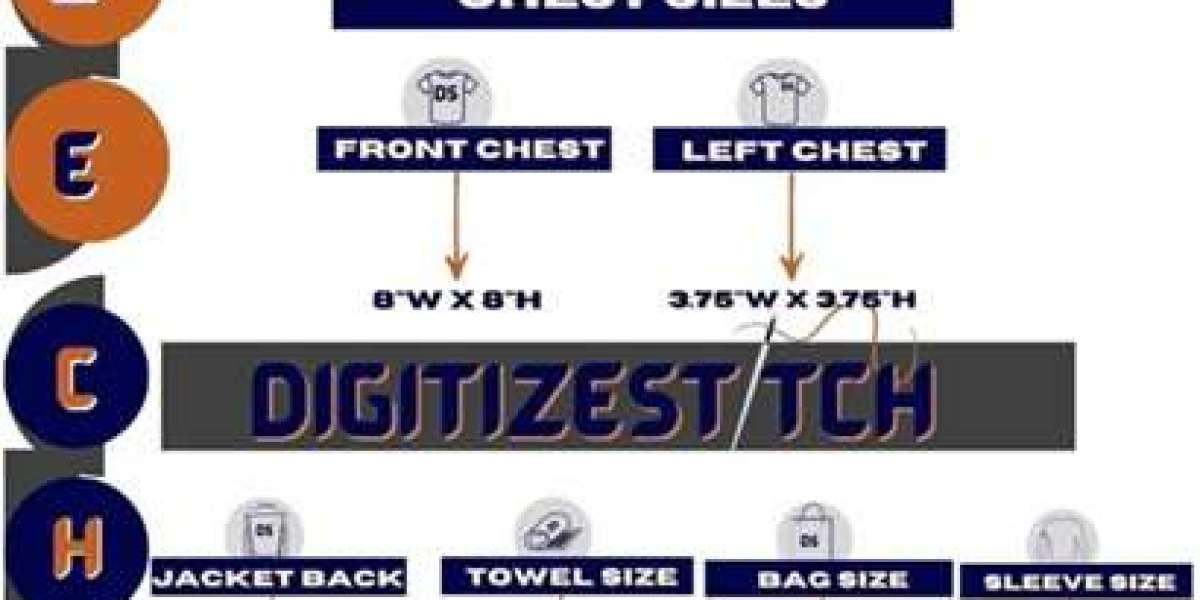
Turns out, the embroidery size chart wasn’t just a helpful guide—it was the key I was missing. Once I understood how to match logo size to item type, things started making more sense. I didn’t realize that 2.5 inches on a hat wasn’t the same as 2.5 inches on a sweatshirt. The fabric type, hoop space, and design all mattered. I kept redoing jobs and wasting money. That was until I found a service that helped digitize and size everything properly.
Learn About Digitizing Changed Everything
I had no idea what “digitizing” meant at first. I thought I could just upload a regular logo and the machine would do the rest. Nope. You need to digitize logo for embroidery. This helps the stitching machine understand it. You can’t just throw in a JPG or PNG file and expect clean stitches. A human (or now AI tools) has to plan out each thread movement.
I didn’t want to spend hours learning complicated software. That’s when I started using embroidery digitizing services USA. They took my logo, turned it into a clean stitch file, and even sized it for different items. That step alone saved me a lot of trial and error.
My First Real Win: Custom Hats That Didn’t Flop
One of my biggest frustrations used to be hats. The design area was so small. I either crammed too much in, or the design got distorted. With help from a professional, I got my logo digitized specifically for caps. They adjusted stitch angles, density, and underlay—stuff I’d never thought about.
Then they used the embroidery size chart to pick the right width for a low-profile cap. The result? The logo looked sharp, not squeezed. Customers started commenting on how professional the hats looked. It gave me the confidence to create more custom embroidered patches for jackets and bags.
3D Puff Was The Game-Changer
I didn’t even know 3D puff embroidery was an option until I saw a sample. It made my logo pop. One part of the logo was raised off the surface, and it added this extra level of texture that just made it look high-end. I thought it would be expensive and hard to pull off, but the digitizing team just needed to know which areas to puff.
They told me that puff needs special spacing and different stitch types. Luckily, they handled it. I just had to tell them what part I wanted raised. That small change made my brand look more premium—and people started noticing. I even began charging more for puffed versions on hats and hoodies.
Mistakes I Used To Make (And How I Fixed Them)
Before using a service, I made a lot of wrong assumptions.
- I thought one logo file could work for everything.
- I didn’t know that different fabrics need different stitch types.
- I used one size for all items.
- I skipped test runs.
Now? Every item is tested, sized properly, and stitched exactly how I want it. The embroidery digitizing services USA I use now walk me through everything. I just send them the artwork, tell them the product type, and they prep the file for it. They even label it for caps, polos, hoodies, or patches. That alone fixed 80% of my early problems.
Small Changes Made Big Impact On My Business
Before, embroidery was just an “add-on” to my products. I didn’t expect it to do much. But once the quality improved, something strange happened. People started ordering because of the embroidery. They saw the quality. They felt it. The threads didn’t snag or curl. Letters were readable. The sizing looked clean and balanced.
Customers started tagging my products online. They were proud to wear my brand—and embroidery became part of my identity. And the best part? The logo looked great on all types of gear—hoodies, work shirts, hats, and gym bags. Each piece was custom-sized and digitized effectively. That level of consistency built trust. I could finally say “yes” to wholesale orders without worrying about stitch quality.
How I Use Embroidery Today (Real Example)
Last month, I launched a batch of custom embroidered patches for a local event. Instead of guessing the shape and size, I sent my logo and patch size to the digitizer. They told me how many stitches it would take, which edge style worked best, and gave me an accurate file. No wasted fabric. No resizing later.
And because I’d already used 3D puff embroidery on hats. Customers recognized the style and trusted the new product too. I reuse that same digitized file in many sizes. One for hats, one for polos, one for large patches. I keep them all organized with clear labels. I finally feel in control.
One Tip I Wish I Knew Sooner
Don’t skip the test stitch. Even with the best digitizer, you need to test on the actual fabric. The embroidery size chart is useful, but testing in real life shows how fabric pulls or distorts. When I started doing sample runs—just one or two items—I avoided big mess-ups. If I could go back, I’d spend less time guessing and more time testing.